A Short and Easy ARK: Survival Evolved Server Setup Guide

Prerequisites

You’ll need a Windows server for this. If you want to install on Linux, use THIS tutorial.

Step 1 – Setup SteamCMD

Download SteamCMD  (direct download link here). Since the program will later download additional components, I would recommend putting it somewhere separate (like C:/SteamCMD/ for example). After extracting the content of the zip archive, there should be a file called SteamCMD.exe.

Step 2 – Download the game

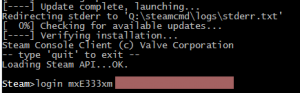
Start SteamCMD.exe. Once that program has finished downloading the rest of itself, it will prompt you for input. Replace the relevant placeholders with the correct information. For the purposes of this guide we will assume that your installation directory is “C:/SurvivalServer/”

login anonymous
force_install_dir C:\SurvivalServer\ 
app_update 376030 validate 
howitshouldlook-300x93
How the SteamCMD Update should look

 Step 3 – Install the rest of the prerequisites

You now need to install DirectX and the Visual Studio 2013-Redist package. Conveniently enough, setups for those were already downloaded into the last step. Hence please execute the following installers

C:\SurvivalServer_commonredist\DirectX
C:\SurvivalServer_commonredist\Vredist

Step 4 – Create a startup script

Since you don’t want to have to type in a huge command every time you start the server, please create a new text document StartServer.bat in your server directory. Copy the following code into the file and replace the placeholders “CHOOSEAPASSWORDHERE” and “CHOOSEANADMINPASSWORDHERE” by the password (and admin password) of your choice.

start ShooterGameServer "TheIsland?SessionName=GameServerSetup?QueryPort=27015?ServerPassword=CHOOSEAPASSWORDHERE?ServerAdminPassword=CHOOSEANADMINAPASSWORDHERE?listen"
exit

Save the file.

You can also add other parameters here. Just take a look at this list of possible parameters


Step 5 – Make sure that you have opened the relevant ports

UDP on ports 27015 and 7777

Make sure your firewall allows data to pass through to these ports. If you’re at home (or in any environment using NAT for that matter), you may also have to forward the ports. PortForward.com contains guides that explain how to do this. Note that port 27015 was the one we set as QueryPort in Step 3. If you at this point chose to use a different port for this function, you’ll have to open that port instead.


Step 6 – Start the Server

Simply double-click your “StartServer.bat”.     If this guide doesn’t work for you, or you require additional help, please feel free to leave a comment.

How to Fix: Torches don’t illuminate the surroundings

This article explains how you can fix some problems related to improper illumination, especially those happening around camps and torchfire, that the “performance-saving” configurations which have been floating around for a couple of days cause.

Chances are high that you’ve tuned some settings in the configuration (or alternatively have downloaded a configuration file like this one) in the hopes that you’ll increase performance thereby.

The problem

The problem lies in the option

r.simpledynamiclighting=1
  in ARK\ShooterGame\Saved\Config\WindowsNoEditor\Engine.ini

The fix

Delete that line and the torch-illumination should be back to normal. Please note that this will however significantly reduce the performance gain. This the dilemma here (at least until the game has been optimized further): Either you’ll have the comfy cozy light or a high framerate.

Altnernatives

Gamma Correction
Gamma Correction

Another Setting you can try to play around with is the Gamma setting. Basically, it’s a setting that describes how pronounced differences in luminance are, and you can tune it as you see fit. Simply use the gamma command ingame to change it.

Taming Tutorial

You will be able to virtually any animal in “ARK: Survival Evolved” once you know how to do it. Considering the vast benefits of having tamed animals at ones disposal, they can after all be used as guard dogs, means of transportation or entertainment, it’s without a doubt essential to the advanced player to learn how taming works.

This tutorial is for the classic taming. Since patch 182 it’s possible to tame without knocking the animal unconscious. Read more in our dedicated “Non Violent Taming Tutorial

Taming

Step 1 – Temporarily render the animal unconscious

The first thing you have to do is to get the animal into an unconscious state, as it will resist your attempts at tamin it otherwise. Mind you, you’ll have to be careful not to kill the animal in the process! The more soft you manage to transition the animal into a suitable state the better, as it will speed up the next part significantly. To that end, you’ll want to either use Tranquilizer Arrows or the less fancy option of fist-fighting.

Step 2 – Feed the animal

This is how the animal gets used to your presence. Open its inventory (“E”-key) and insert a sufficient amount of a suitable food into it (the higher the level the more sustenance it needs). Note the word “suitable” here, as every animal only accepts a specific food. You can tell which one needs what by consulting the following table, though a good rule of thumb is that carnivores will need a sort of meat while herbivores require berries.

Berries Meat
Azulberry Blue: Ankylosaurus, Brontosaurus Raw / Prime: Carnotaurus, Dilophosaur, Shark (Megalodon), Piranha, Pteranodon, Raptor, Sabertooth, Crocodile (Sarcosuchus), Spinosaur, Titanoboa, Tyrannosaurus
Azulberry Red: Turtle (Carbonemys), Dodo
Mejoberry (Violet): Triceratops, Stegosaurus, Elephant (Phiomia), Parasaur, Mammoth Spoiled: Scorpion(Pumonoscorpius), Vulture (Argentavis)
Tintoberry (Red): Stegosaurus

Step 3 – Assure Anaesthesia and Provide a Steady Supply of Food

At this point you should see an interface similar to this one:


The Taming Interface
The Taming Interface.

There are two important progress meters here: The Narcotics-Bar (currently filled) and the Taming-Bar (currently empty), the first one of which is integral to the whole taming process. Generally speaking, in order to tame you have to ensure that your animal is unconscious for long enough to consume a sufficient amount of food. What that means in pratice is that you’ll have to see to it that your animal is permanently sedated. In that state it will only move its head up once in a while.

How does one do that? With Narcotics or Narcoberries. You can get the latter in large quantities by picking virtually any bush. Simply put them into the animal’s inventory. You can gauge how much items and time you’re going to need by looking at our taming time cheatsheet or using our taming calculator

As soon as the taming is finished the animal awakes. You can now assign it a name (a dialog to that effect should pop up, otherwise you’ll be able to do it by looking at the animal, holding down “E” and waiting until the menu below appears. This menu is also what one uses to control the animal, but there’s more about that in the article devoted to that topic)


Das Menü des gezähmnten Tieres

Tips and Tricks

  • In case you run out of Narcoberries there is always the possibility of hitting the animal softly. Be careful though, you risk injury (which in turn impedes the taming process)
  • Carnivores and Herbivores have different preferences regarding narcotics (“Narcotics” and “Narcoberries” respectively). Getting them the wrong one will slow down everything.
  • You can accelerate Carnivore-taming significantly by feeding them Eggs and Prime Meat. Don’t give the developers any ideas though, otherwise we could soon find ourselves having to sauté the meat in order to satisfy the picky eaters that are dinosaurs.


We recommend you read the guide on animal keeping, or the one on uses for animals next.

New Server Settings Format in Patch 171.0

(Link to the original announcement)

As it turns out, there has been a change in the way the game expects settings. The Command Line Options now have to also specify a value, ie where there was only ?ServerPvE there now must be ?ServerPvE=true.

In better news, there now is a way to actually have a configuration file for the Server. The GameUserSettings.ini contains the following section:

[ServerSettings]
ShowMapPlayerLocation=False
ServerHardcore=False
GlobalVoiceChat=False
ProximityChat=False
NoTributeDownloads=False
AllowThirdPersonPlayer=False
AlwaysNotifyPlayerLeft=False
DontAlwaysNotifyPlayerJoined=False
ServerHardcore=False
ServerPVE=False
ServerCrosshair=False
ServerForceNoHUD=False
ServerPassword=
ServerAdminPassword=
DifficultyOffset=0 to 1

ARK Patch 171

(This is a summary of the important changes that will come with the upcoming patch. Omitted are client-changes and client-bugfixes. To view the original patch announcement in its entirity, click here.)

Please note that this quotes the expected patch-notes for an upcoming patch, and therefore none of the changes are currently online.

Hosting Related

New Features

  • Added a “Difficulty” slider for Local/Custom Servers that scales the levels of the creatures encountered, along with the quality of loot (but not quite linearly with each other, so you can expect a tougher challenge overall as that slider goes up!).
  • Added the capability to choose respawn region upon each player respawn. Set 12 spawn regions, rather than 4.
  • You can now whitelist specific SteamID’s that will always be granted access to your server. Even if it’s full.
  • All Host Game options are now visible in the in-game launch menu (which also affects single player), as well as saved in INI for easy access
  • Console key can now be rebinded through the Options Menu
  • On your server, you can now use ‘cheat’ or ‘admincheat’ to cheat after logging in as and admin. “cheat broadcast MessageString” will now let you broadcast a server message to everyone on your server (which also force displays the chat). Note that you can also set a Message-Of-The-Day here:[MessageOfTheDay]
    Message=Hello and welcome to my ARK Server!

Bugfixes

  • Downloading ARK Data Characters into other Servers will no longer lose them

Game-Mechanics

  • Argentavis now has a very limited (60% reduced) targeting range for live creatures, but his targeting range for corpses has been boosted by 40%. So watch out if you’ve got a dead body around, you might want to get out of the way. In any case, this is more true to their real-world likely behavior and will make them grief less.

How to access the server console

Usually you can access the ingame command input for the server through double-clicking the tilde (~) key. A command line awaiting your input should appear at the bottom of your screen.

Update: As of version 171 the part below is no longer neccessary. You can now simply change the Keybinding in the Options-Menu.

Somethimes though, this doesn’t work (the command input simply doesn’t appear). In this case, the following tip might be helpful. Go to the file

YourInstallationDirectory\ARK\ShooterGame\Config\DefaultInput.ini

At the very end of this file you will find the following lines.

ConsoleKey=None
+ConsoleKeys=Tilde
;+ConsoleKeys=Tab

Replace them with this:

ConsoleKey=None
+ConsoleKeys=Tilde
+ConsoleKeys=Tab

(or, alternatively, in case the above fails you, with this:)

ConsoleKey=Tab
+ConsoleKeys=Tilde
;+ConsoleKeys=Tab

Save the file and restart the game. You should now be able to access the Server Command Input via the TAB key.

Possible Server settings

The following server settings exist for “ARK: Survival Evolved”. You can either specify them in the command line you use to start the server like this

ShooterGameServer "[your normal server parameters]?ServerPVE=true"

Or alternatively, you can use the force_install_path\ShooterGame\Saved\Config\WindowsServer\GameUserSettings.ini (from patch 171.0 onwards). That file contains the following section, in which you can set the option values.

[ServerSettings]
DifficultyOffset=0.200000
GlobalVoiceChat=False
...
ARK: Survival Evolved Setting Effect
ServerPVE Enables the PvE-Mode. Players can no longer beat each other to death, or grief other players buildings.
ServerHardcore This will enable Hardcore-Mode. Once you die, your character will be deleted.
ServerCrosshair Enables the Crosshair
ServerForceNoHUD Disables the character name displays which float around in the world.
AltSaveDirectoryName Saves the Game-Files in an alternative directory.
GlobalVoiceChat Can everyone voice-chat with every one on the server, or are they limited by proximity?
NoTributeDownloads Prevents Items and Characters from being loaded from other Servers.
AlwaysNotifyPlayerLeft Does what it says. It will display a message if players leave the server.
DontAlwaysNotifyPlayerJoined Disables the aforementioned messages.
AllowThirdPersonPlayer Allows players to go into third-person mode.
MapPlayerLocation Will display the exact coordinates and position of players on ingame maps. [Added 05 June]

ARK: Survival Evolved 1.70 Patch Notes

(This is a summary of the important changes that will come with the upcoming patch. Omitted are client-changes and client-bugfixes. To view the original patch announcement in its entirity, click here)

Hosting Related

New Features

  • Added ?MapPlayerLocation command argument for player-hosted servers, when used will display the current player location on the 3D Map. (not very hardcore/realistic ?
  • Broadcast Server messages now force the chat to appear (typically used to notify of server maintance)

Changes in the Server List

  • Player counts on the server browser are now correct and accurate
  • Increased # of server search from 50 to 100
  • Server browser now has a list of “Survivor’s Servers”, upon which you have a survivor, Favorite Servers, and Friend’s Servers
  • Filter “password protected” servers on the Steam backend, rather than locally, to return more servers

Overall this sounds like it goes a long way towards fixing the server list. Especially the last point, which will lead to more servers being displayed ingame, is good news.

Bugfixes

  • Fixed an issue where NPC’s would not attack often at lower-FPS times on servers

Game-Mechanics

  • Added missing “Spyglass” engram (like binoculars), which also enables you to craft the later glasswares. Moved the “Scope” Weapon Attachment to level 30, down from level 40.
  • Balance: Fist Damage reduced by 20%, Argentavis AI aggressiveness reduced by 25%, Tran Arrow Tranq-Power increased by 20%, Slingshot Torpidity Power Decreased by 10%
  • Reduced the rate at which food spoils in the inventory of an NPC creature, by 75%, to aid long-term creature maintenance
  • Selfie orbit cam, [K] by default, now collides with structures geometry so that you can’t use it to… spy… into other players’ houses… creeper!
  • Deutsch
  • Русский
  • Svenska
  • 中文 (中国)
  • Español
  • Português
  • Français

Featured Articles

Advertisement

Categories