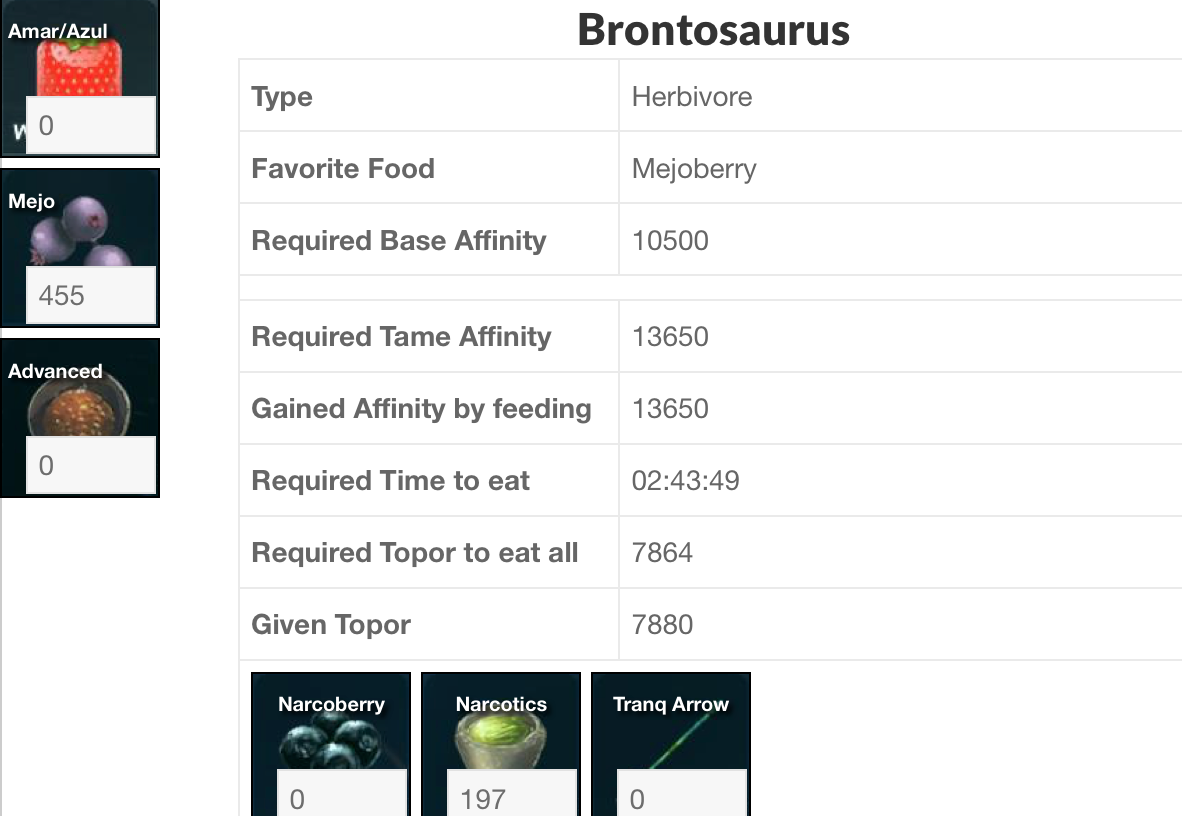
Did you ever find an animal you wanted really bad, but you weren’t sure if you have the required amount of time, food and narcotics? Now you can use our taming calculator to find out – before you tame it! Try it out! Link

Did you ever find an animal you wanted really bad, but you weren’t sure if you have the required amount of time, food and narcotics? Now you can use our taming calculator to find out – before you tame it! Try it out! Link
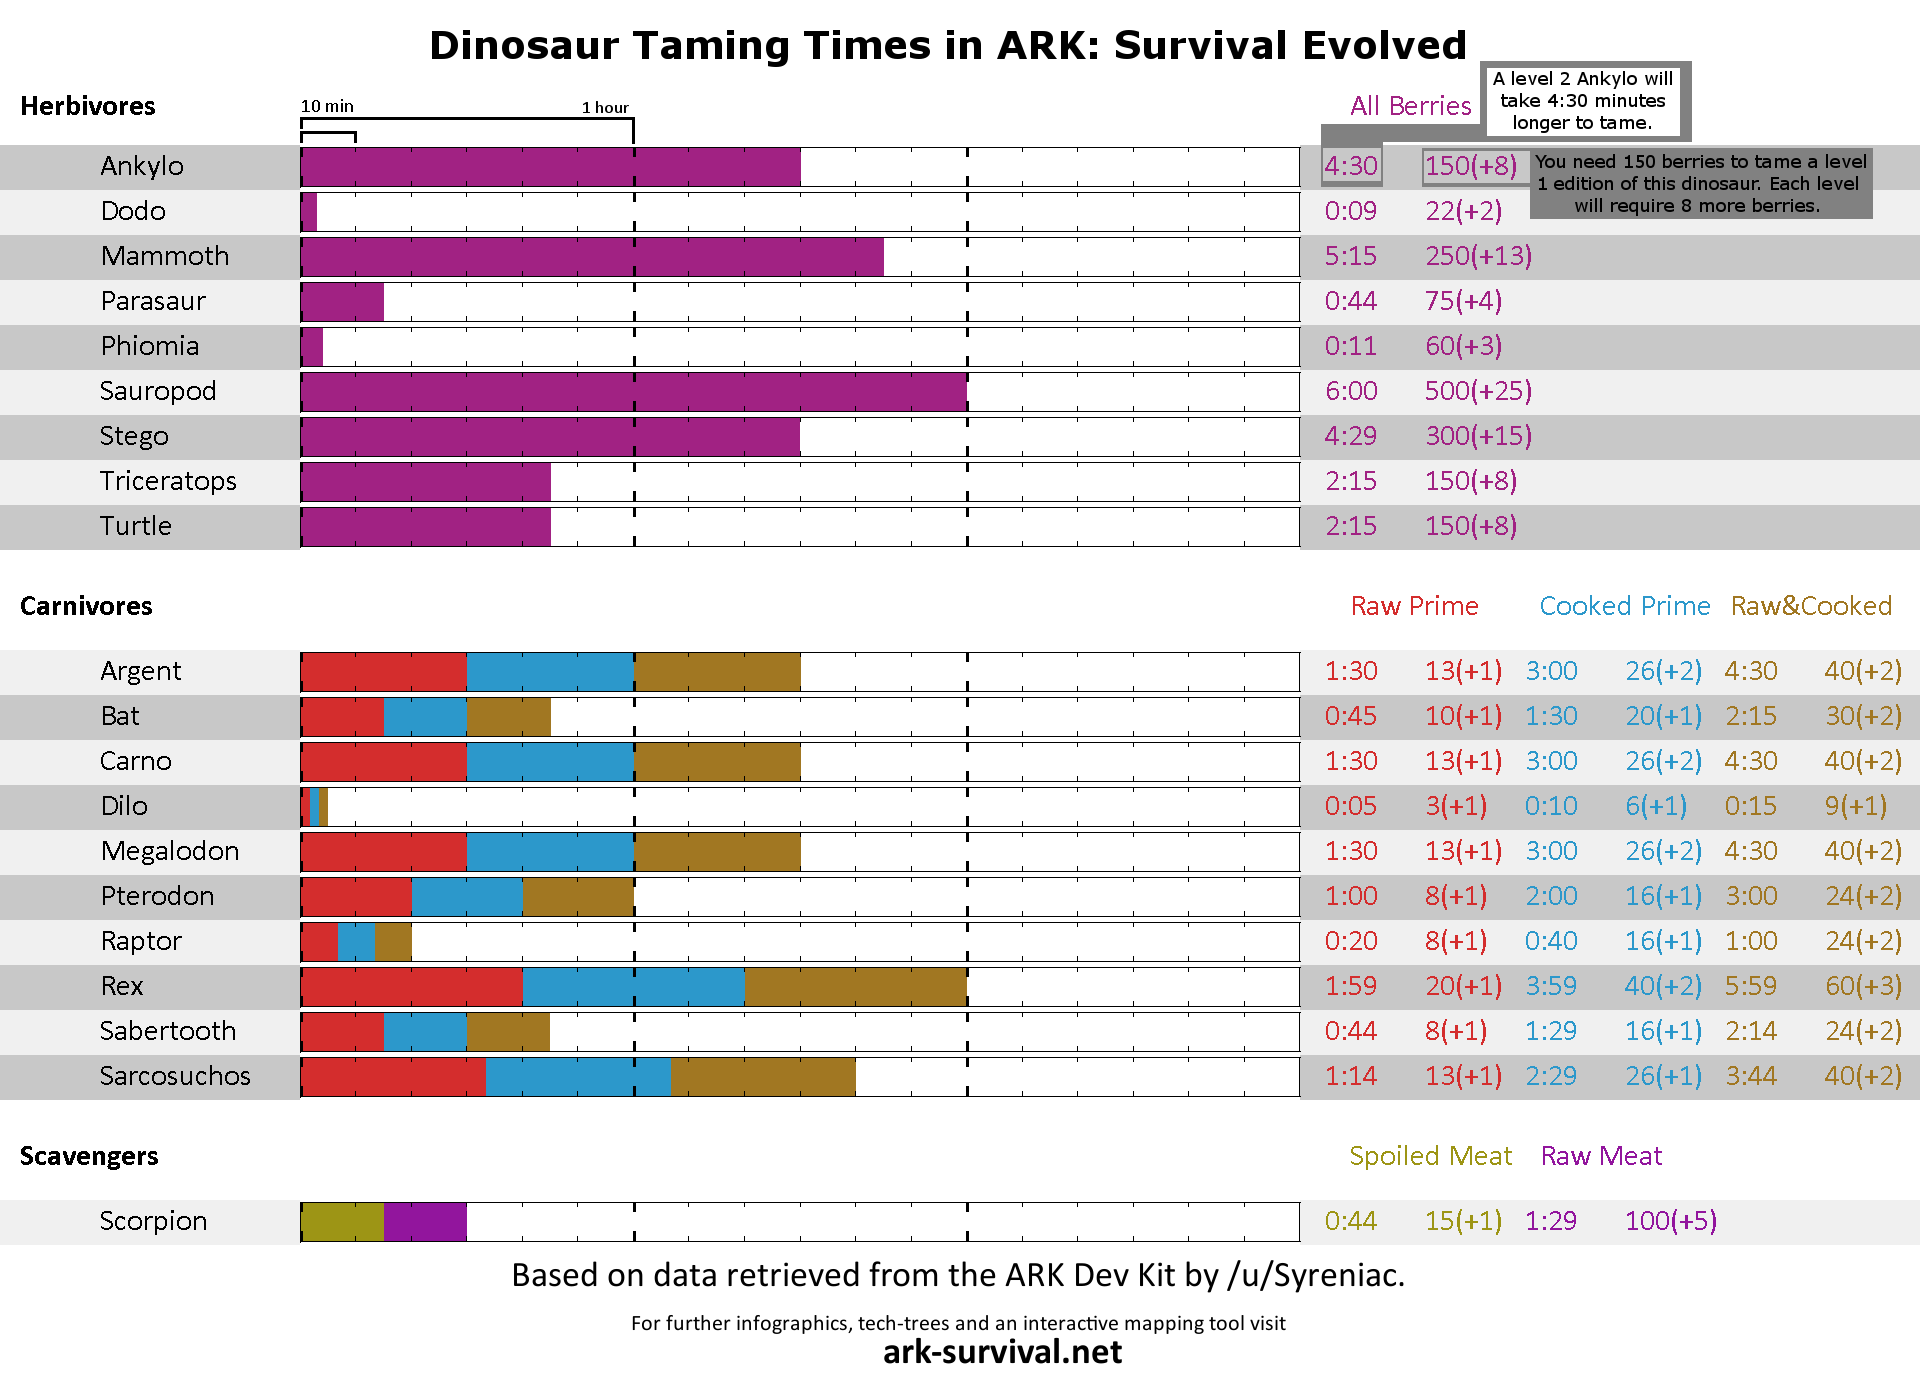
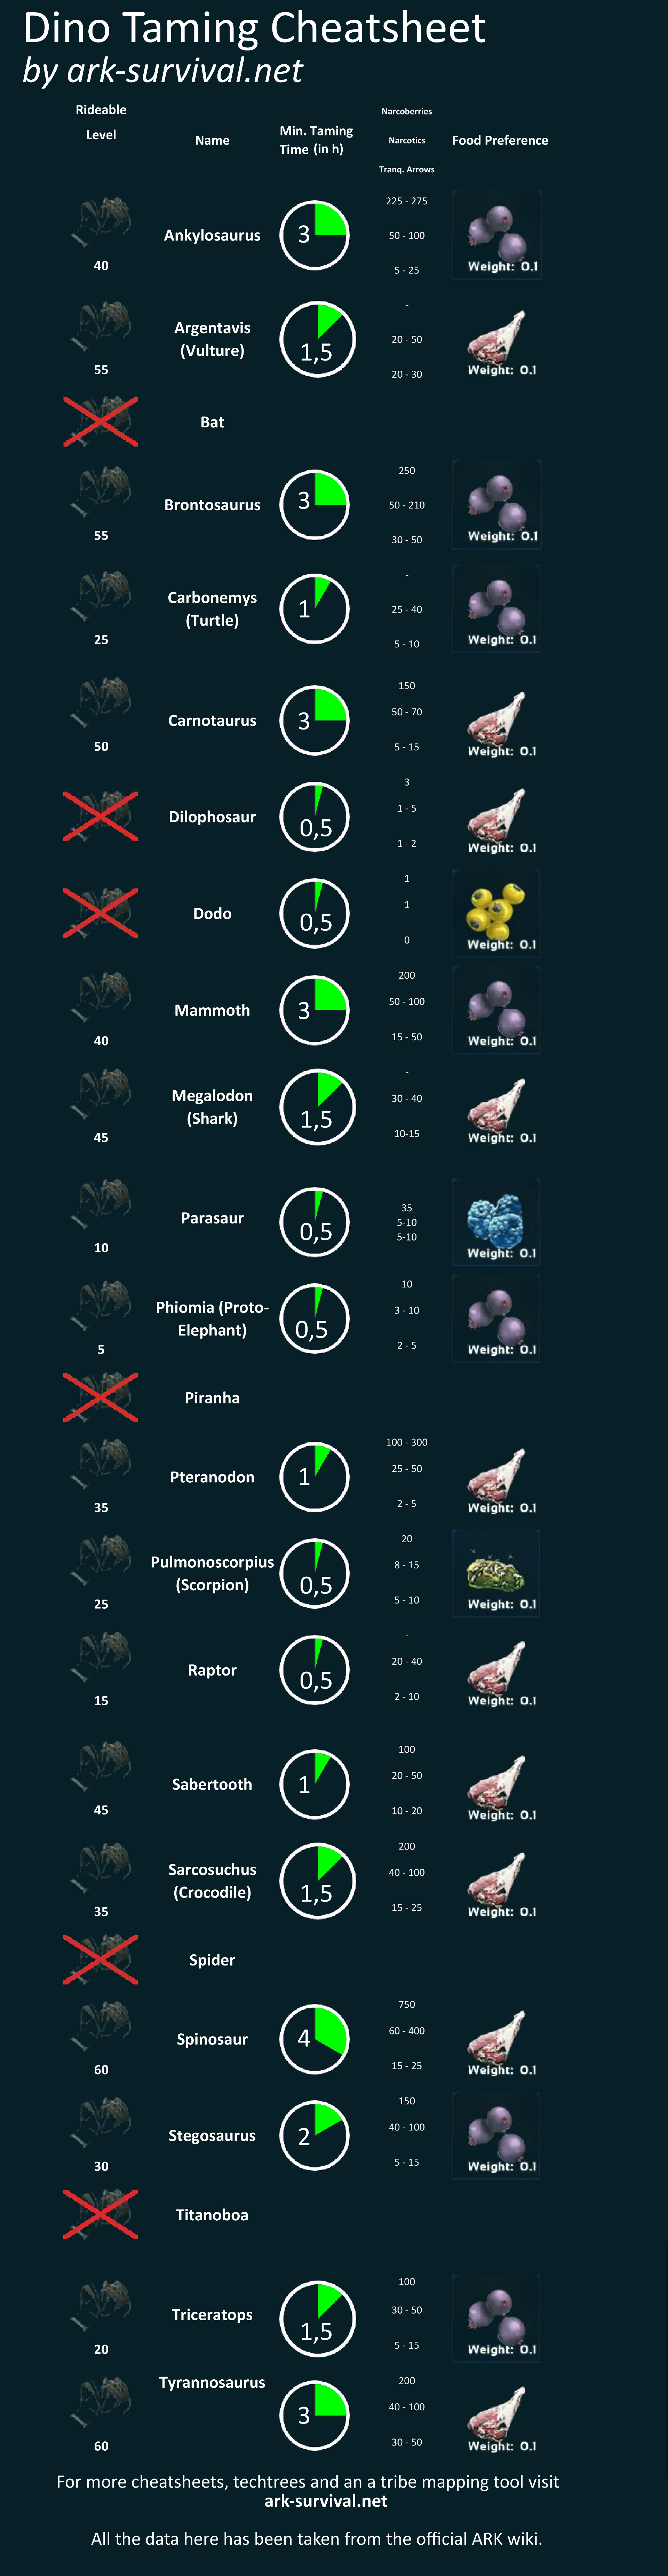
Thanks to the work of reddit’s /u/Syreniac, we can now make statements about the precise times for perfect taming! See our cheatsheet (click to enlarge!). Please note that this assumes perfect taming, in practice you’ll need more time in order to hunt the animal, knock it out, ….
Discuss this on reddit.
Linking etiquette
Due to the rapid changes that come with Early Access, I expect taming times to change over time as well. This infographic will be updated to reflect that, but I can’t guarantee it will have the same filename. So please link to this post instead of hotlinking the image file if you want the person clicking the link to see the most current version.
Update log
#1: Added additional items needed per level & corrected Pterodon data. Note that the additional items per level are rounded up, and therefore will be slightly inaccurate for large levels.
These are the changes of ARK: Survival Evolved’s Patch 177.1, grouped into categories for clarity. If not otherwise indicated, they’re quoted from the relevant Steam Thread.
(Original Announcement on Steam)
Here are the patchnotes of the previous patch (177.0)
Here’s a Dino Taming Cheatsheet. It is also available in bigger resolutions (huge and really huge). You might also be interested in our tech-trees.

ARK has released its linux dedicated server. This is a short tutorial on “how do i install ark dedicated server on a linux machine”.
You need console access for this tutorial. So fire up your server and enter a shell of your choice.
First you’ll have to download SteamCMD from Valve (Download and Installation Tutorial).
After installation of SteamCMD you’ll have to trigger the following commands for installation of ARK:
mkdir /home/arkdedicated
./steamcmd.sh +login USERNAME PASSWORD +force_install_dir /home/arkdedicated +app_update 376030 validate +quit
You can also use +login anonymous (after June,20 2015).
Remember this command. You need to trigger it each time you want to update the server.
ARK requires to open a hell lot of files. So you may need to increase the maximum file open limit on your host machine if the server doesn’t start as it should. Tutorial
To start the server you’ll have to enter the following commands:
cd /home/arkdedicated/ShooterGame/Binaries/Linux
./ShooterGameServer TheIsland?listen?SessionName=ServerName?ServerAdminPassword=whateveradminpass -server -log
We suggest using the Linux Tool “screen” to keep the server alive. Install screen and open it up, then enter the command and press “CTRL+A” then “D” to deattach it
Of course you can use other commandline options and modify the configuration file like described here. The configfile is located at \ARK\ShooterGame\Saved\Config\WindowsServer\GameUserSettings.ini
If you want to migrate from windows to linux, just copy the folder \ARK\ShooterGame\Saved\SavedArks\ from your windows installation to you linux machine.
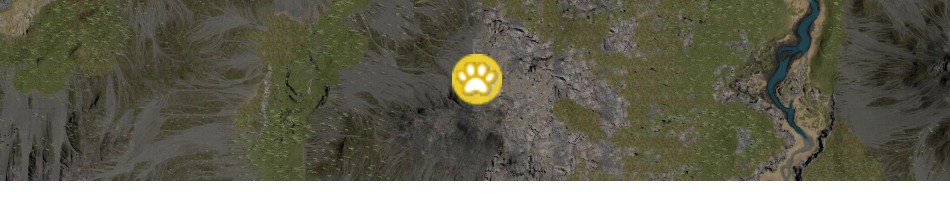
The most difficult thing about coordinating a tribe in ARK is that it’s incredibly hard to keep track of all the locations of outposts, good resources, enemy bases, or other interesting things. How great would it be if each Tribe had a map, on which everyone could mark points of interests? You can do exactly that with our new Map Tool for Tribes.
After clicking on the link you’ll see the map. Clicking on “Create new private Map” will create a new private map for you. Everyone who has the link to that map will be able to see what’s on it, and will be able to edit it. So be careful as to who you share the information with.
To place a marker, click on the spot where it’s supposed to be. A little bubble will pop up asking you for a name, a description, and a choice of icon. After you’ve entered it, click on okay to save the marker.
To remove a marker, click on its icon and then click “Remove”.
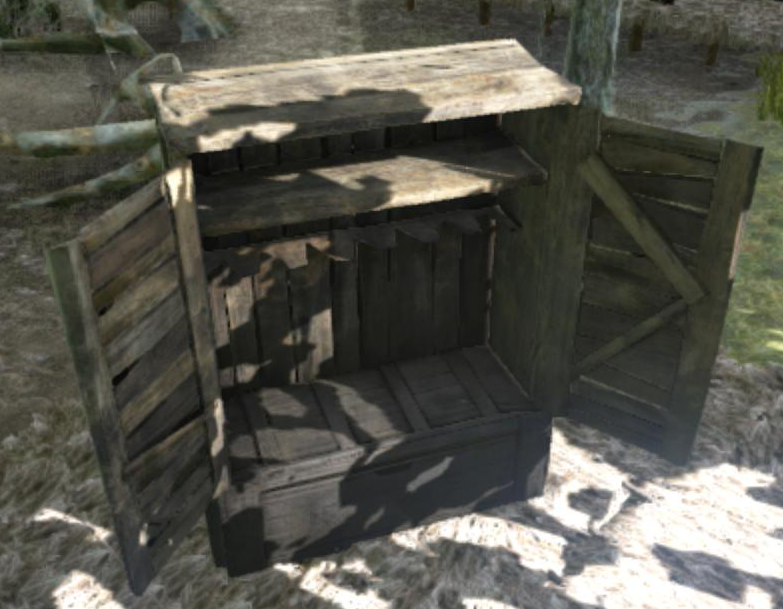
The trusty bookshelf is by far the most convenient way to store your research results. With 100 slots it offers a lot of room, but that comes at a price: You can only store Blueprints, Specimen Implants and Notes there. Unlike the Reinforced Steel Vault, it is affordable before the endgame. The Engram is available at Level 20, and there is no required Foundation tile.
To craft the Bookshelf, you need

The Reinforced Steel Vault arrived with Patch 177.0, and is a great way to store large amounts of items. However, it comes with a hefty pricetag. As you can see below it requires an impressive amount of resources, which puts it at the end-game stage.
You need the following items to craft a Reinforced Steel Vault:
Additionally you will need the relevant Engram (Lv. 65, 30 points).
The Reinforced Steel Vault must be placed on a Foundation! Due to its impressive size, and its significant weight it can’t be placed elsewhere. Careful though, if someone is able to destroy the foundation beneath it, it will be destroyed.

